Creating texture fills for your design in a CAD software can be a time consuming sidetrack in a project. In this article, we are going to introduce the Hatch Fill Extension for Inkscape by a little project demonstration!

This extension developed by Evil Mad Scientist Laboratories for Inkscape lets you produce interesting Hatch Fill textures for your project. They are behind the Eggbot Project, AxiDraw, the WatercolorBot (as a joint project with Zephyrus T) just to name a few out of the many crazy and amazing projects this team has been working on. Do check them out!
You can find the Github Page for the EggBot Extension here and the EggBot Wiki right here. They have a Twitter page, a Facebook page and a Youtube channel as well.

Before you continue reading, make sure that you have Inkscape installed. If you are new to Inkscape: it's a free open source vector graphics program that is a popular choice for creating SVG & DXF files suitable for importing into laser cutter software like LightBurn, RDWorks & Lasercut. It is available for Windows, Linux and Mac systems
To get the files, head over to "Assets" on the official Github page for the project here.
Once you have downloaded the compressed folder, extract the contents into the folder where you set Inkscape to find your custom extensions. Check out Inkscape's official page for a quick guide on how to locate this folder. If you need more information or help with installing the extension, check out this page which gives a detailed explanation for several operation systems.
In our article, we will work through the steps using Windows - the interface should be nearly the same across all platforms.
NOTE: Make sure every file from the downloaded archive is copied into the Extensions folder, otherwise you might face errors mentioning missing scripts.
Restart Inkscape afterwards. Inkscape only loads new extensions at startup.

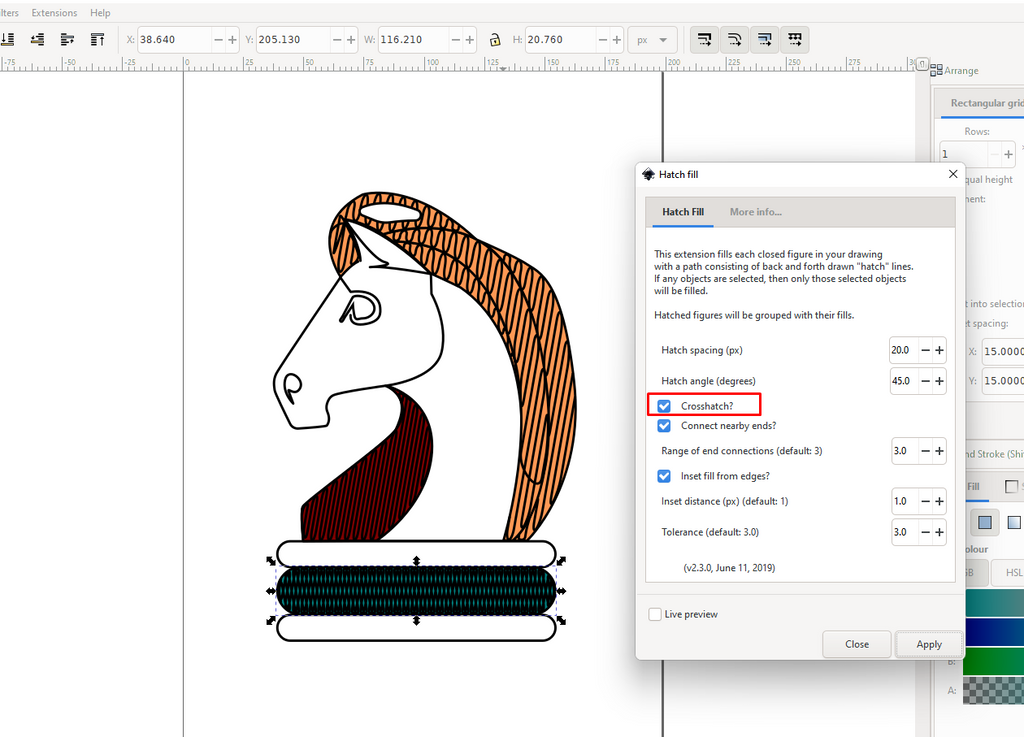
The Hatch Fill Extension will produce a texture into areas which has a fill added to them. In case you do no specify which filled closed parts you fish to add hatch fill texture to, the extension will automatically handle every object and produce a hatch fill texture over the whole closed outline of the design.
In the screenshot above, you can see we used 3 different colours - each colour will be used to demonstrate a different kind of hatch fill texture configuration. Remember that these are just examples, and the extension is capable of countless outcomes depending on how you adjust your settings.

Find the Extension following this route.

Check the pop-up menu of the Hatch Fill Extension. If your hardware capabilities allow, tick the "Live preview" box so you get an instant preview with the settings you used as you keep adjusting them. The extension is explaining what each option and adjustment would yield, so go have a play with them! We used two different settings in the mane of the horse figure.

For an interesting "3D" effect inside curved bits such as the stand of the figure, we ticked in the "Crosshatch?" field.
Be careful: if you have generated some hatch fills before this operation and have "Live Preview" ticked in, this process might take a little while. It may even load for minutes, so be patient! If you do not wish the fills to be curved like on our horse, remove the tick from the "Connect nearby ends?" option.
When you are satisfied, go ahead and load the design into your preferred software for preparing files your laser cutter. We used Lightburn Software for our design. Let's get to cutting!

We like the result of this experiment!
A keychain which we use to keep the keys of our BEAM-E laser cutter in order. Important keys need nice and reliable keychains!
If you would like to make the Knight Piece yourself, here is the file for you to use it freely!
Link to the .SVG file.
Link to the Lightburn Software file.
Show us your makes by tagging us (smoke_and_pictures) on Instagram !
Happy making!

