Prepare an array of serial numbers on your batch projects using the Variable Text function in LightBurn Software!

The Variable Text function in LightBurn Software has several options to automate numbering in your projects:

Normal text, Date/Time, Merge/CSV, Serial Number and Cut Setting. Each feature is rather complex and interesting on their own, so we will go with introducing the "Serial Number" function in our current article.
To follow along the demo, you can find the LightBurn file for this demo at the end of this article. Let's go!

Type "d" and place the text to the position you wish to have a serial number counter added. "D" stands for "Decimal", and it helps the software understand that you are adding a sort of command line it needs to link with a selected feature. For the demonstration, we chose to use "Arial" as font to show the interactive elements clearly, however you can go ahead and use just about any fonts you would like. After this, keep the "d" selected, then find the drop down menu on the header (by default it shows Normal) and pick "Serial Number".
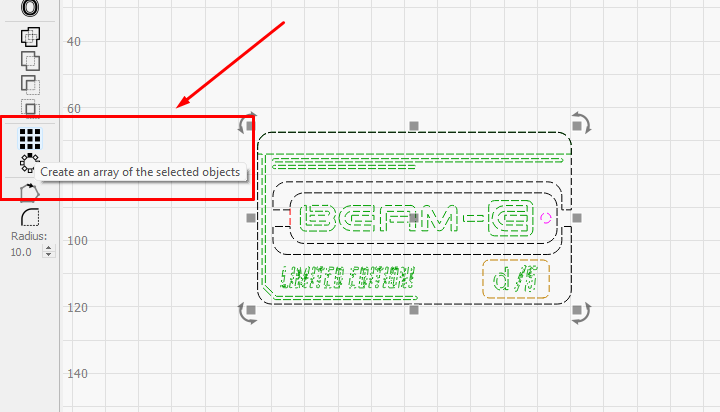
To easily create an array, or rather a batch of copies from your design, find the little grid looking icon on the left. This will take off the time consuming labor of having to copy your design by hand and paste them around manually.

Let's go through the options that we used. "X Columns" will produce multiples of your first item horizontally. To increase the amount of rows vertically, adjust the slider in "Y rows".
NOTE: make sure to turn off "Create Virtual Array". Later when you get to virtually test your serial numbers, it might not show any results if you leave this option green (ticked). You should try out what the other sliders do as well!

Click on "Test" to see how your serial numbering will appear on the designs. Note that when you release the button, the virtual test will disappear into "d" again. Don't worry: once the file is transferred into your laser cutter, these serial numbers will appear instead of the "d".
Ready?!


The settings for the border of the BEAM-E logo tab was configured so that at the end, it can be easily broken out to be used as a keychain. We used 4mm poplar plywood here.

We hope that you enjoyed trying out the Variable Text Feature in LightBurn!
Find the file for the keychain right here.
If you want to learn more technical details about the Variable Text feature, find LightBurn's official documentation right here.
We recommend checking out this video introduction on the topic by Laser Livestream.
Show us your makes by tagging us (smoke_and_pictures) on Instagram !
Happy making!